OCLint静态代码分析
设计思路
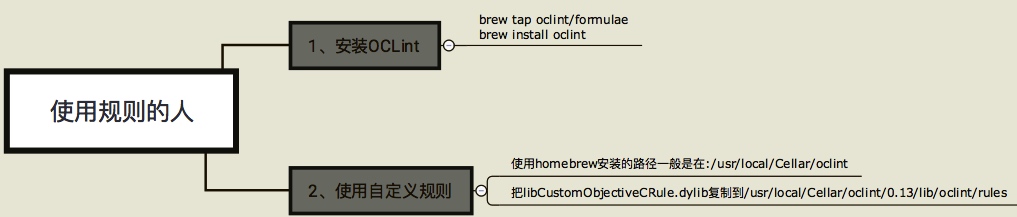
1、如果只是单纯的使用OCLint官方提供的检验规则,直接使用Homebrew安装;
2、如果想自定义检验规则,则需要下载源码收到编译。
这里以自定义规则为例(下面出现的“规则”一词,统一表示为“OCLint静态代码分析规则”):一个开发团队,分为使用规则的人和制定规格的人。使用规则的人,用Homebrew安装OCLint即可;制定规则的人,则需要下载OCLint源码,手动编译。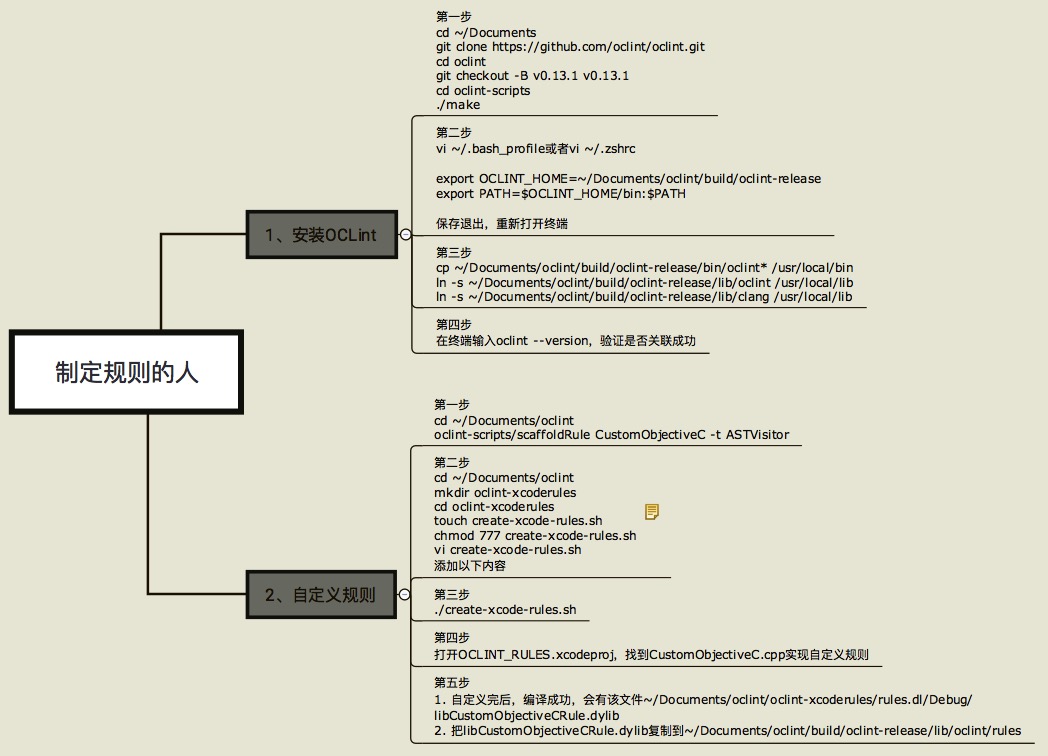
OCLint
以下内容截取官网:
OCLint is a static code analysis tool for improving quality and reducing defects by inspecting C, C++ and Objective-C code and looking for potential problems.
Relying on the **abstract syntax tree** of the source code for better accuracy and efficiency.
安装
官方提供了两种方法:1.Homebrew;2.源代码安装
Homebrew安装
brew tap oclint/formulae

brew install oclint
源代码安装
如果你想自己写rule,那么必须使用源码进行安装:
在GitHub下载OCLint源码:OCLint
 cd ~/Documents

 git clone https://github.com/oclint/oclint.git

 cd oclint

 # 检出tag中的v0.13.1版本到为v0.13.1分支

 git checkout -B v0.13.1 v0.13.1
进入oclint-scripts目录执行:
 cd oclint-scripts

 ./make
make可能出现错误:
make不要指定并行编译的任务数(make -j2),之前有指定,编译出现莫名其妙的错误;
make: error: unable to find utility "make", not a developer tool or in PATH,没有安装command_line_tools,去Apple官网下载对应的版本,我系统10.13,XCode9.3版本,对应的就是Command_Line_Tools_macOS_10.13_for_Xcode_9.3.dmg;
CMake Error: CMake was unable to find a build program corresponding to "Ninja".,没有安装ninja,使用brew install ninja安装;
编译成功后,会有以下路径:
~/Documents/oclint/build/oclint-release这个就是编译好的oclint,我们还需要把这个路径添加到系统的PATH中,在.bash_profile中添加:
 OCLINT\_HOME=~/Documents/oclint/build/oclint-release

 export PATH=$OCLINT\_HOME/bin:$PATH
进入~/Documents/oclint/build/oclint-release目录,执行:
 cp ~/Documents/oclint/build/oclint-release/bin/oclint\* /usr/local/bin/

 ln -s ~/Documents/oclint/build/oclint-release/lib/oclint /usr/local/lib

 ln -s ~/Documents/oclint/build/oclint-release/lib/clang /usr/local/lib
这里我使用*ln -s*,把lib中的clang和oclint软链接到/usr/local/lib中,是为了后面自己编写rule能快速的更新/usr/local/lib中对应的oclint库,而不需要每次更新自定义rule库,又要手动copy到/usr/local/lib。
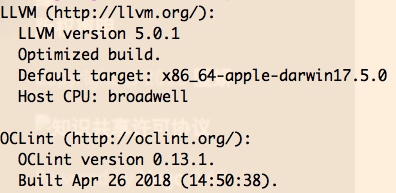
重启启动终端,然后输入:
oclint --version出现以下打印信息说明安装成功:
自定义Rule
OCLint提供了70+的检查规则,但是如果这些还不能满足?那么就需要我们自定义Rule。
进入~/Documents/oclint/目录,执行:
oclint-scripts/scaffoldRule CustomObjectiveC -t ASTVisitor其中“CustomObjectiveC”是你定义的检查规则名字;“ASTVisitor”是你继承的Rule。
这里可以继承如下规则:SourceCodeReader、ASTVisitor、ASTMatcher,具体的含义我还没有研究。
执行完上述命令后,分别在以下路径生成对应的文件:
 ~/Documents/oclint/oclint-rules/rules/custom
 ~/Documents/oclint/oclint-rules/test/custom
为了方便开发,可以生成xcodeproj文件,回到oclint目录,执行以下命令:
 cd ~/Documents/oclint
 mkdir oclint-xcoderules
 cd oclint-xcoderules
 touch create-xcode-rules.sh
 chmod 777 create-xcode-rules.sh
打开create-xcode-rules.sh并添加以下内容
 #! /bin/sh -e

 cmake -G Xcode \
     -D CMAKE_CXX_COMPILER=../build/llvm-install/bin/clang++  \
     -D CMAKE_C_COMPILER=../build/llvm-install/bin/clang \
     -D OCLINT_BUILD_DIR=../build/oclint-core \
     -D OCLINT_SOURCE_DIR=../oclint-core \
     -D OCLINT_METRICS_SOURCE_DIR=../oclint-metrics \
     -D OCLINT_METRICS_BUILD_DIR=../build/oclint-metrics \
     -D LLVM_ROOT=../build/llvm-install/ ../oclint-rules
执行:./create-xcode-rules.sh
出现下面log说明生成xcodeproj成功

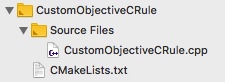
打开OCLINT_RULES.xcodeproj,会发现Sources目录下面有很多文件夹,自定义的Rule一般都是在最下面:
我们修改并build自定义的Rule后,会生成对应的:libCustomObjectiveCRule.dylib,要立即使用新生成的Rule,就要把新生成的dylib文件复制到:~/Documents/oclint/oclint-release/lib/oclint/rules
因为我们在“源代码安装 -> 第4步骤”中使用了软链接的方式,所以这里不再需要手动更新/usr/local/lib/路径中对应的oclint库。
但是每次build自定义的Rule,又要手动的copy到~/Documents/oclint/oclint-release/lib/oclint/rules目录,也是麻烦。所以为了把这步也省掉,在自定义Rule的Target中添加如下命令:
cp ~/Documents/oclint/oclint-xcoderules/rules.dl/Debug/libCustomObjectiveCRule.dylib ~/Documents/oclint/build/oclint-release/lib/oclint/rules/libCustomObjectiveCRule.dylib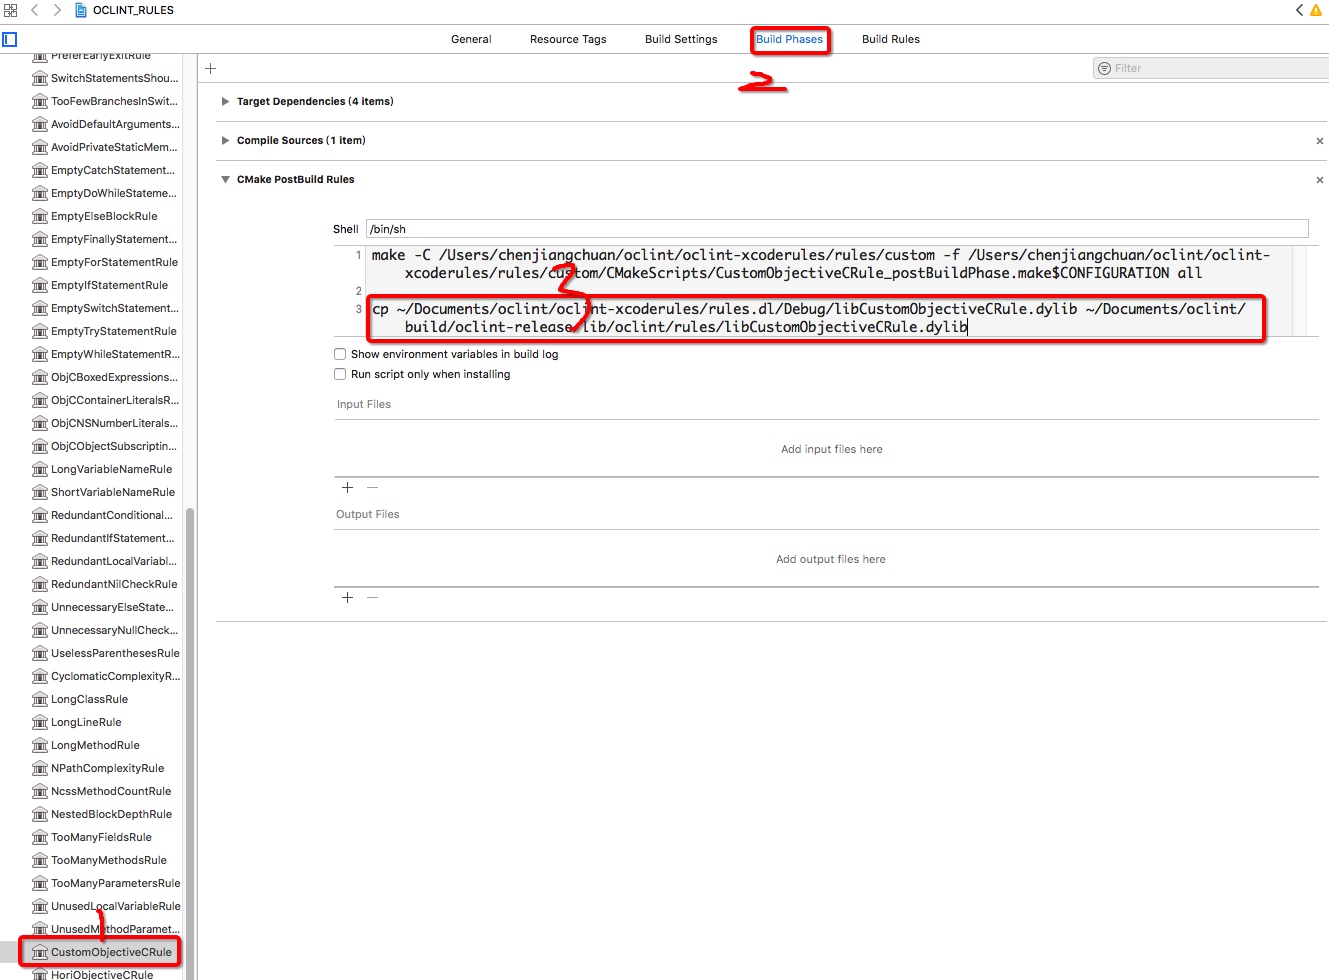
Homebrew安装的OCLint如何使用新规则
查看OCLint安装路径:


把libCustomObjectiveCRule.dylib复制到/usr/local/Cellar/oclint/0.13/lib/oclint/rules
使用OCLint
在命令行中使用
前提:需要安装xcpretty:gem install xcpretty
1、如果项目中使用了Pod,则需要指定 -workspace xxx.xcworkspace; 2、每次编译之前需要clean
这里以公司的项目为例:
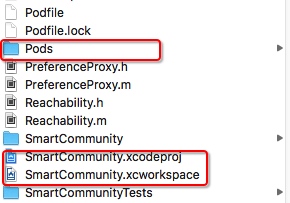
进入项目
cd ~/Desktop/iOS-SmartCommunity会看到几个关键的文件:Pods、SmartCommunity.xcodeproj、SmartCommunity.xcworkspace
查看项目的基本信息
xcodebuild -list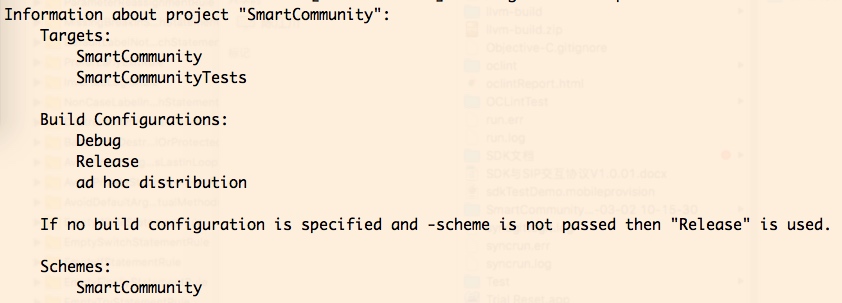
编译
/* 1.编译之前必须先clean; 2.指定scheme和workspace */ xcodebuild -scheme SmartCommunity -workspace SmartCommunity.xcworkspace clean && xcodebuild -scheme SmartCommunity -workspace SmartCommunity.xcworkspace -configuration Debug | xcpretty -r json-compilation-database -o compile_commands.json编译成功后,会在项目的文件夹下出现compile_commands.json文件
生成html报表文件
 // -e Pods表示忽略Pods这个文件夹
 oclint-json-compilation-database -e Pods -- -report-type html -o oclintReport.html
到这步,可能会出现下面的错误: oclint: error: one compiler command contains multiple jobs:,打开项目,把PROJECT和TARGETS中的
COMPILER_INDEX_STORE_ENABLE设为NO,再重新执行第三步“编译”!!
公司项目里面有个存放第三方框架的文件夹ThirdPartyLib(历史遗留问题),这个文件夹也可以忽略,于是执行:
oclint-json-compilation-database -e Pods ThirdPartyLib -- -report-type html -o oclintReport.html但是!!注意!!这里又出现了oclint: error: one compiler command contains multiple jobs:报错,具体原因不明。
题外话,由于项目庞大,xcodebuild后生成的compile_commands.json文件达到25M,全部进行静态分析,大概得一小时以上(主要看Mac配置)。所以目前我的想法,每个月由负责这块的人生成一个报表然后发邮件给大家。或者,使用:
oclint-json-compilation-database -i 需要静态分析的文件夹或文件 -- -report-type html -o oclintReport.html,对个别文件夹或文件进行静态分析。
在XCode中使用
都是操作性的东西,看图,不文字说明了:
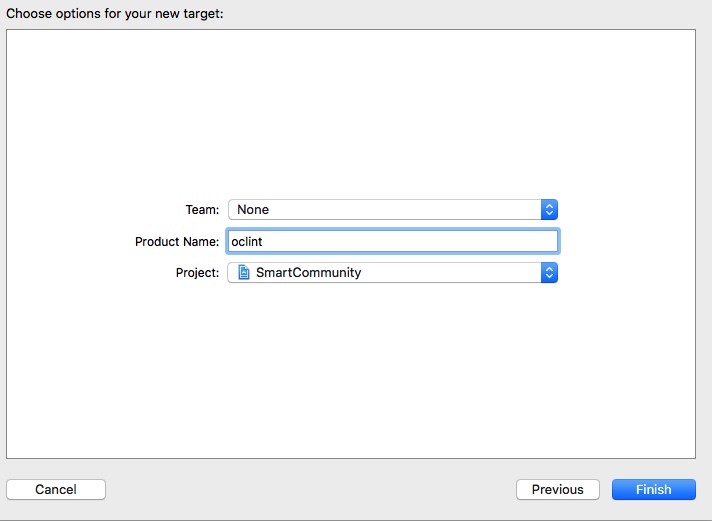

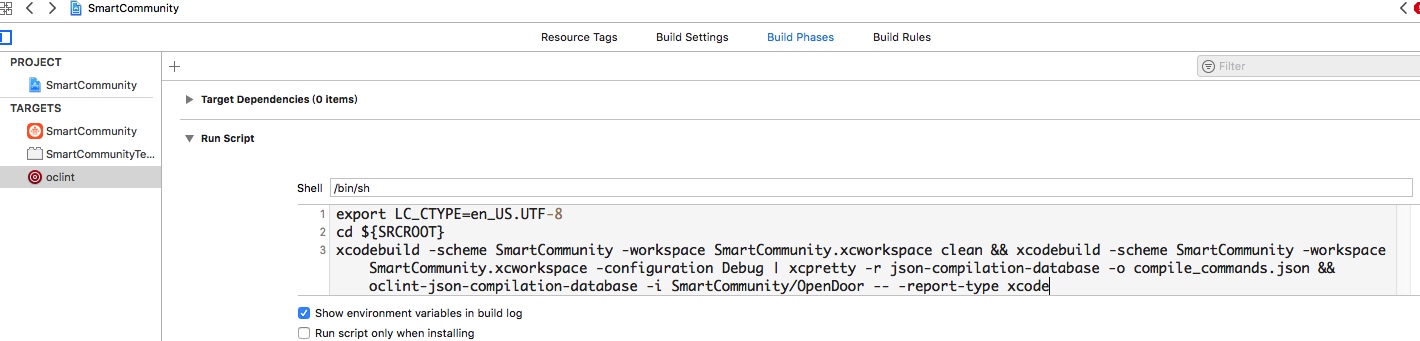
添加的脚本:
export LC_CTYPE=en_US.UTF-8
cd ${SRCROOT}
xcodebuild -scheme SmartCommunity -workspace SmartCommunity.xcworkspace clean && xcodebuild -scheme SmartCommunity -workspace SmartCommunity.xcworkspace -configuration Debug | xcpretty -r json-compilation-database -o compile_commands.json && oclint-json-compilation-database -i SmartCommunity/OpenDoor -- -report-type xcode
1、export LC_CTYPE=en_US.UTF-8设置编码格式,否则会报错:in `===': invalid byte sequence in US-ASCII (ArgumentError);
2、oclint-json-compilation-database -i SmartCommunity/OpenDoor -- -report-type xcode,这里我只静态分析SmartCommunity/OpenDoor这个目录下的文件。
如果出现下面这信息,说明分析成功,即使XCode提示Failed都没关系:

3、我们打开SmartCommunity/OpenDoor目录的文件看看:

这里出现的警告就是OCLint分析出来的。